Managing Users
- How-to Guide
- Logging On
- Your Dashboard
- Scheduling a Group Event
- Scheduling a 1-2-1 Event
- Editing an Existing Event
- Hosting a Group Chat Event
- Hosting a 1-2-1 Chat Event
- Sharing Media in an Event
- Live Streaming with OBS
- Data and Content After the Event
- Editing Content
- Media
- Custom Email Templates
- Managing Users
- Network Connectivity
Managing Users
You are free to add other moderators to your control panel as required – as guest moderators for particular events or just as part of a wider team.
Access to the control panel is by way of social network account. This reduces the amount of passwords held on our system for security reasons, but also allows you to worry about one less password to remember. Other users can be added by the email address associated with their preferred social network account or by using the ‘request access’ method of invitation. We recommend the latter, as often LinkedIn will report that it knows about a different email address to the one your colleagues may be expecting. If in doubt – try the ‘request access’ method first!
Navigate to the ‘Users’ page from the menu on the left-hand side. The ‘Add User’ section at the top of the page shows the link you can use to invite users.

Copy the link shown and email it to the colleague you wish to invite
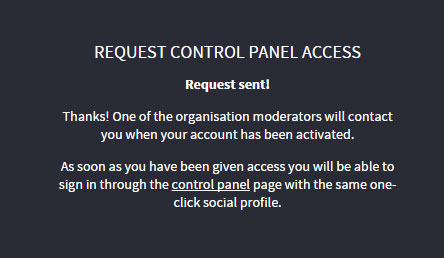
The link sends them to a page that looks like this:

When they’ve clicked through with their preferred social account and allowed access to the ‘Meet and Engage’ app, they will see the following confirmation:
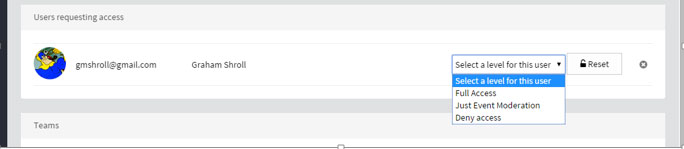
If you now look on the ‘Users’ page again, you will notice a section marked ‘Users requesting access’, showing the colleague you invited. At this point they cannot logon to the system, and don’t yet have access to your control panel account.
Using the drop-down list to the right, you can choose what level of access to allow them. Full Access gives full access to the control panel, the ability to change content, schedule new events and invite other moderators. The ‘Just event moderation’ option does as one would expect – limiting the user to event moderation only. Finally, if a person you don’t recognise appears in the list, or you sent to a person in error, you can choose ‘Deny access’ to remove them.
Removing or Changing User Access
Current users are shown along with their access level. Simply change the level of any users by adjusting the dropdown list for that user. Users can be removed from your control panel account by clicking on the ‘x’ to the far right of their row.

Managing Teams
Teams are a way to logically group users with access to your control panel account. The purpose is in restricting moderation of certain events to certain groups of users (see the ‘Restricting moderation’ part of scheduling a group event or scheduling a new 121 event)
To create a new team, choose a team name (e.g. ‘Marketing’) and type it into the new team box. Press ‘Add’.

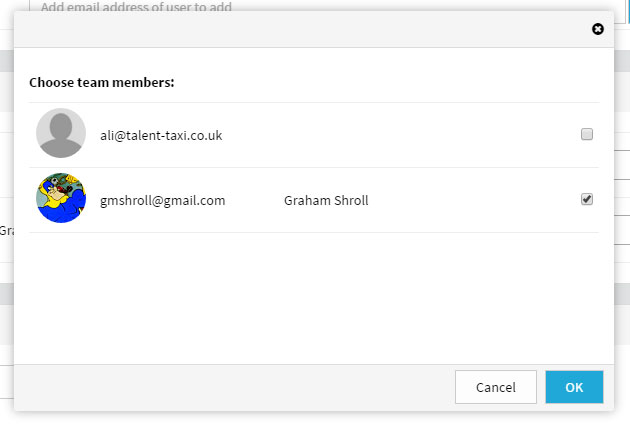
The following box appears, allowing you to choose the team members for the new team. Select each member you wish to add and click on ‘OK’. The team will be created.
You can select existing teams to edit them. Teams with no members are deleted.